The mechanical joining procedure using flanges implies the evaluation of many variables that must be considered in order to obtain areliable joint over time.
Forthis reason, this procedure is considered a « special process » from a technical point of view.
The designer responsible for carrying out the work must be able to understand and evaluate the forces that oppose the creation of the joint and, consequently, the forces involved in the production of the hydraulic seal.
Plastitalia S.p.A. suggests considering the content of UNI/TR 11588 – Guidelines For Mechanical Joint With Flanges Of Polyethylene (Pe) Piping Systems.
The joining process must be described in a tighteneen procedure, evaluated and approved by the project manager and must be given to staff, in turn specifically trained for tighteneen operations.
Below are some suggestions which can be considered as generai rules to follow for the production of reliable flanged joints.
- The total clamping torce (Ft) exerted by the joint must be greaterthan the sum of the forces of:
- F1 = line pressure
- F2 = anywater hammer
- F3 = due to misalignment of piping
- F4 = due to misalignment between flanged components
- F5=safetyfactorin% Therefore Ft::::: (F1 + F2 + F3 + F4 + F5)
- Bolt tighteneen shall occur with a sequence called a « cross » and operators must mark bolts (when found in the presence of flanges requiring more than 8 bolts) in order to avoid confusion during the tighteneen procedure.
- Screws and nuts must be lubricated. Use motor oil (30W) or dynamically light grease.
- The tightening torque must be applied to nuts (heads of screws must be kept stilI) using a torque wrench according to the increasing fractions of torque
- After 4 hours, proceed with further tightening, applying 100% of the final torque value. For diameters exceeding 400 mm, this procedure should be repeated after 24 hours.
- The gasket, preferably equipped with a centring hole, should rest over the entire sealing surface of the fiange adaptors and must have a hardness between 65 and 75 Shore degrees.
NOTE: for an exact calculation of the screws tightening forces, the designer should know all the technical data of the gasket (such as thickness, specific weight, hardness, compression yeld load, elongation, etc.).
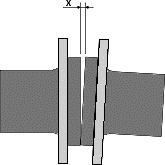
- Misalignment of surfaces to be joined should never exceed a value attained using the equation below:
X= Q_Q_(mm)
200

