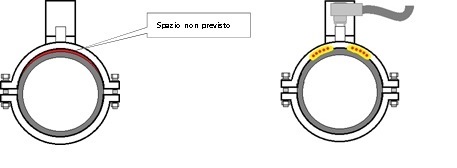
An electro-fusion saddle incorporates a coil through which the electric current is made to pass for the purpose of generating heat up to the point in which the polyethylene, which is near the coil, melts (about 230 °C).
The heat generated by the coil is transmitted to the surface of the pipe, which also melts. The materials making up the fitting and pipe, being fused and in contact with each other, are mixed; this action is aided by the coefficient of linear expansion which causes the polyethylene to expand, thus creating, also in this case, the welding pressure. In order for the expansion to determine the incrementation of the welding pressure, the upper part of the fitting needs to be held pressed against the surface of the pipe. The figures below show an example of a wrap-around saddle equipped with the bottom part.The bolts blocking the two parts must be tightened with the right force to avoid part of the saddle remaining out of contact with the surface of the pipe.

Correct preparation of elements to be welded
The base procedure (UNI 10521) requires the following 5 stages to be carried out:
- Prepare the elements to be welded: all traces of mud, dust, grease or any other dirt on the outer surface of the pipe in the area affected by welding. Cleaning must be carried out with water and then with clean rags free of line or soft paper towel dipped in a suitable liquid cleaner;
- Mark the scraping zone: on the surface of the pipe where welding will occur, using the marker. The zone to be scraped must be at least 10 mm, per side, greater than the contact surface of the wrap-around saddle;
- Remove the oxidised surface layer:: on the outer surface of the pipe, the layer of surface oxidation must be removed using dedicated scrapers, whether manual or mechanical. The scraping operation must be complete and uniform across the entire surface affected by welding
- Clean the scraped surface: the scraped surface must be cleaned with a suitable cleaner. Before moving on to the next stages, ensure the entire surface is completely dry. The cleaning operation with the cleaner must also be carried out on the surface where the coils of the electro-fusion saddle (which must only be extracted from its protective packaging just before positioning on the pipe) are located.
- Block the saddle on the pipe: carefully read the instructions of the saddle producer. If the fitting is a bottomless saddle use the dedicated positioner.
Welding cycle
After completing the stages illustrated proceed as follows:
- Connect the terminals of the control unit to the electro-fusion fitting: check that the diameters of the connection terminals and fitting terminals correspond, transfer the welding parameters indicated in the bar code of the fitting to the control unit by means of the optical reader, and if everything coincides start the welding cycle;
- Mark the joint: using the marker, write the hour and minutes shown on the clock and which represent the end of the fusion time; mark the joint with its name (or abbreviation/code);
- Wait for the entire cooling time to pass: only once the cooling time has completely passed can the welding zone be moved.
